Lesson 8 - Dripping Crystals
Lesson Overview:
This lesson will introduce students to cave formations, also known as speleothems, and the basic process in which they form.
Objectives:
Students will be able to:
Standards Addressed:
National Science Education Standards: 5th-8th grade
Duration of Lesson/Time Requirement: 40 minutes for the introduction and to set up the initial experiment. Allow the students a few minutes during class over the next couple of days to record observations about their experiment. Dedicate at least 10 minutes during a future class period to wrap-up and discuss the results of the experiment.
Materials Required:
Pictures of decorated cave passages
Pictures of stalactites and stalagmites
Epsom salts (magnesium sulfate)
Baking soda (sodium bicarbonate) - optional
Washing soda (sodium carbonate) - optional
Warm water
For each pair or small group of students:
Classroom Technology:
Computer with Internet connection and projection capabilities and/or SMART Board (optional)
Set-Up:
Gather materials necessary for Activity #2 and divide accordingly for pairs/small groups of students.
Procedure:
Introduction
Explain to the students that now that they have investigated how caves are formed it is time to learn about what is found inside of them. Ask the students to raise their hand if they have ever been inside of a cave. What types of things did they see there?
Activity #1
Project pictures of decorated cave passages for the students to view or pass pictures around the classroom for them to look at. Write/project the word “speleothem” for the students to view. Ask the students if they have ever heard the word speleothem before and if they know what it means. Tell the students that cave formations or decorations are called speleothems. Speleothems are cave features formed by the deposition of minerals. Explain to the students that the word speleothem is derived from the Greek words spelaion meaning “cave” (this should be review from Lesson #1) and thema meaning “deposit”. Ask the students if they know the names of any types of speleothems. The speleothems that most people are familiar with are stalactites and stalagmites. Project/show the class pictures of stalactites and stalagmites and write/display the terms for them to view. Ask the students if any of them know the difference between stalactites and stalagmites. Tell the students that stalactites grow down from the cave ceiling while stalagmites grow up from the cave floor. It is easy to remember which is which: Stalactites have a “c” for ceiling and hang tight to the ceiling while stalagmites have a “g” for ground and might grow up from the ground to reach the ceiling some day.
Ask the students if they know how stalactites, stalagmites, and other speleothems form. Tell the students that speleothems form because of water. Have the students think about how caves form. Review the process of cave formation. Ask the students if they can explain what happens when rainwater or snow melt seeps through ground. (As water passes through organic material such as decaying plants and animals it picks up carbon dioxide and creates a carbonic acid solution) Explain to the students that as the weak acid passes through the joints and cracks in the limestone it dissolves the mineral calcite from the rock. When the water that now holds the dissolved rock (the calcite) is exposed to the air in the cave it releases the carbon dioxide gas, much like when a can of soda pop is left on the counter (it degases and goes flat). As the carbon dioxide is released, the calcite is precipitated (re-deposited) on the cave walls, ceilings, and floors. Over time the re-deposited minerals buildup to form speleothems. If the water droplets enter the cave at a slow rate the calcite is re-deposited on the ceiling and stalactites may eventually form. If the water droplets enter the cave at a faster rate they fall to the floor of the cave and the calcite is re-deposited there where a stalagmite may eventually form.
Tell the students that speleothems form at varying rates. Ask the students if they can think of different factors that may determine the rate of growth of a stalactite or a stalagmite. Explain to the students that two important factors which may affect the growth rate of speleothems include:
Ask the students if they can think of reasons why the temperature outside of a cave could influence the growth rate of the speleothems found inside of a cave. Explain that the temperature outside of a cave can affect the rate of decay of plants and animals, therefore affecting the amount of carbon dioxide in the soil. What would the result of less carbon dioxide in the soil be? (The water entering the cave would be less acidic and may not dissolve calcite from the limestone as easily. This may result is less calcite being re-deposited in the cave and a slower rate of speleothem growth.) What would the result of more carbon dioxide in the soil be? (The water entering the cave would be more acidic and therefore may dissolve and carry more calcite from the limestone with it. This may result in more calcite being re-deposited in the cave and a faster rate of speleothem growth.)
Ask the students if they can think of reasons why the amount of rainfall/snowmelt could influence the growth rate of the speleothems found inside a cave. Explain to the students that the shapes of the speleothems are determined by how the acidic water enters the cave. Water can enter a cave by dripping, seeping, or splashing. The shapes of speleothems are also determined by how the water stands or flows after entering the cave.
This lesson will introduce students to cave formations, also known as speleothems, and the basic process in which they form.
Objectives:
Students will be able to:
- Define "speleothem".
- Describe how stalactites and stalagmites form.
- Model stalactite and stalagmite formation.
Standards Addressed:
National Science Education Standards: 5th-8th grade
- Content Standard A: Science as Inquiry
- Content Standard B: Physical Science
- Content Standard D: Earth and Space Science
Duration of Lesson/Time Requirement: 40 minutes for the introduction and to set up the initial experiment. Allow the students a few minutes during class over the next couple of days to record observations about their experiment. Dedicate at least 10 minutes during a future class period to wrap-up and discuss the results of the experiment.
Materials Required:
Pictures of decorated cave passages
Pictures of stalactites and stalagmites
Epsom salts (magnesium sulfate)
Baking soda (sodium bicarbonate) - optional
Washing soda (sodium carbonate) - optional
Warm water
For each pair or small group of students:
- 2 cups or jars the same size (preferably clear/see-through)
- 1 piece of aluminum foil to make a “tray” or a small plate/saucer
- 1 spoon or stirrer
- 1 piece of cotton string or yarn (30-50 cm in length)
- 2 paper clips
- Food coloring (optional)
Classroom Technology:
Computer with Internet connection and projection capabilities and/or SMART Board (optional)
Set-Up:
Gather materials necessary for Activity #2 and divide accordingly for pairs/small groups of students.
Procedure:
Introduction
Explain to the students that now that they have investigated how caves are formed it is time to learn about what is found inside of them. Ask the students to raise their hand if they have ever been inside of a cave. What types of things did they see there?
Activity #1
Project pictures of decorated cave passages for the students to view or pass pictures around the classroom for them to look at. Write/project the word “speleothem” for the students to view. Ask the students if they have ever heard the word speleothem before and if they know what it means. Tell the students that cave formations or decorations are called speleothems. Speleothems are cave features formed by the deposition of minerals. Explain to the students that the word speleothem is derived from the Greek words spelaion meaning “cave” (this should be review from Lesson #1) and thema meaning “deposit”. Ask the students if they know the names of any types of speleothems. The speleothems that most people are familiar with are stalactites and stalagmites. Project/show the class pictures of stalactites and stalagmites and write/display the terms for them to view. Ask the students if any of them know the difference between stalactites and stalagmites. Tell the students that stalactites grow down from the cave ceiling while stalagmites grow up from the cave floor. It is easy to remember which is which: Stalactites have a “c” for ceiling and hang tight to the ceiling while stalagmites have a “g” for ground and might grow up from the ground to reach the ceiling some day.
Ask the students if they know how stalactites, stalagmites, and other speleothems form. Tell the students that speleothems form because of water. Have the students think about how caves form. Review the process of cave formation. Ask the students if they can explain what happens when rainwater or snow melt seeps through ground. (As water passes through organic material such as decaying plants and animals it picks up carbon dioxide and creates a carbonic acid solution) Explain to the students that as the weak acid passes through the joints and cracks in the limestone it dissolves the mineral calcite from the rock. When the water that now holds the dissolved rock (the calcite) is exposed to the air in the cave it releases the carbon dioxide gas, much like when a can of soda pop is left on the counter (it degases and goes flat). As the carbon dioxide is released, the calcite is precipitated (re-deposited) on the cave walls, ceilings, and floors. Over time the re-deposited minerals buildup to form speleothems. If the water droplets enter the cave at a slow rate the calcite is re-deposited on the ceiling and stalactites may eventually form. If the water droplets enter the cave at a faster rate they fall to the floor of the cave and the calcite is re-deposited there where a stalagmite may eventually form.
Tell the students that speleothems form at varying rates. Ask the students if they can think of different factors that may determine the rate of growth of a stalactite or a stalagmite. Explain to the students that two important factors which may affect the growth rate of speleothems include:
- The temperature outside the cave.
- The amount of rainfall/snowmelt.
Ask the students if they can think of reasons why the temperature outside of a cave could influence the growth rate of the speleothems found inside of a cave. Explain that the temperature outside of a cave can affect the rate of decay of plants and animals, therefore affecting the amount of carbon dioxide in the soil. What would the result of less carbon dioxide in the soil be? (The water entering the cave would be less acidic and may not dissolve calcite from the limestone as easily. This may result is less calcite being re-deposited in the cave and a slower rate of speleothem growth.) What would the result of more carbon dioxide in the soil be? (The water entering the cave would be more acidic and therefore may dissolve and carry more calcite from the limestone with it. This may result in more calcite being re-deposited in the cave and a faster rate of speleothem growth.)
Ask the students if they can think of reasons why the amount of rainfall/snowmelt could influence the growth rate of the speleothems found inside a cave. Explain to the students that the shapes of the speleothems are determined by how the acidic water enters the cave. Water can enter a cave by dripping, seeping, or splashing. The shapes of speleothems are also determined by how the water stands or flows after entering the cave.
Activity #2
Tell the students that they will be participating in an experiment to show how water deposits minerals to create speleothems. Explain that the process of speleothem formation may take hundreds, thousands, or even millions of years in a cave. Tell the students that they are going to speed up the process in the classroom by using a concentrated solution and sunlight to aid in evaporation (if available).
Divide the students into pairs or small groups. Explain the procedure by demonstrating it to the students.
Suggested Procedure:
Note: The solution in the cups will drip onto the tray creating a “speleothem”. Epsom salt and washing soda are likely to result in the growth of stalactites and stalagmites. A speleothem known as a “column” may form if a stalactite and a stalagmite connect. Baking soda is likely to result in the formation of crystals along the piece of string. This closely resembles speleothems known as “popcorn” and “frostwork” and will be discussed in Lesson #9.
Students should see crystals forming within an hour or two after the initial set up of their experiment, however crystal growth may not happen every time. If multiple solutions are being used students should notice that the crystals of the different solutions are different.
Distribute the materials among the pairs or small groups of students. Divide the class according to how many different solutions will be used. Using two or more solutions will allow for a good comparison at the conclusion of the experiment. Allow the pairs or small groups of students time to set up their experiments.
Wrap-Up/Conclusion (During class period of initial set-up)
Once all of the pairs or small groups of students have completed setting up their experiments explain to the students that just like it takes time for speleothems to form in a cave it will also take some time for their speleothems to form in the classroom. Tell the students that over the next couple of days you will allow them a few minutes during the class period to record observations about their speleothem experiments on their Dripping Crystals Student Worksheets. Encourage the students to write descriptions about what they observe and sketch what is happening with their speleothem experiments. Pass out the Dripping Crystals Student Worksheets and allow the students a few minutes to record the status of their speleothem experiment on Day #1. Tell the student to make sure to list what type of solution they are using (Epsom salts, washing soda or baking soda).
Over the next couple of days have the students check their experiments and record their observations. Caution the students that once “speleothems” begin to form they are extremely fragile and any movement of the string could cause them to break. If the students are extremely careful they may choose to use a ruler to record the length of any speleothem growth.
Wrap-Up/Conclusion (During class period a couple of days after initial set-up)
Display the word “speleothem” for the students to view. Ask the students what a speleothem is. What are examples of speleothems? How do stalactites and stalagmites form? What factors can affect the growth rate of speleothems. Briefly, review the mechanisms of speleothem growth with the students.
Discuss the results of the speleothem experiments as a class. Have pairs or small groups of students share what they observed. If multiple solutions were used ask the class if they observed any differences between the growth of their speleothem and the speleothems of their classmates. Did the students notice crystals in other places than at the dip of the piece of string? Where and why? If the students are familiar with the term and process of osmosis ask them what property of water allows the string to stay wet and drip water. (Osmosis) Ask the students what they noticed about the level of the water in the cups. (It went down) What happened to the water? (Much of the water was pulled into the string and dripped onto the tray) Ask the students if this would happen in an actual cave. Explain that the water would drip and go further into the ground. Ask the students what would happen if there was no recharge. What would this mean to the cave system? (Less precipitation on the surface can result in less water percolating through the ground and less water entering the cave)
Project pictures of decorated cave passages for the students to view. Stress the uniqueness and fragility of speleothems. Tell the students that deep within the earth, drop by drop, crystal by crystal, speleothems are forming on the floors, ceilings, and walls of caves. Explain to the students that just like their “speleothems” were fragile, so are those found in caves. What do they think would happen if a person was careless in a cave? Ask the students to think about how long it may take a speleothem to form. Explain to the students that once damaged or destroyed, cave formations can never be replaced. Ask the students what they could do to help protect speleothems (Educate others about how they are formed and how unique and fragile they are; If they visit a cave do not touch the speleothems; etc.)
Tell the students that they will be participating in an experiment to show how water deposits minerals to create speleothems. Explain that the process of speleothem formation may take hundreds, thousands, or even millions of years in a cave. Tell the students that they are going to speed up the process in the classroom by using a concentrated solution and sunlight to aid in evaporation (if available).
Divide the students into pairs or small groups. Explain the procedure by demonstrating it to the students.
Suggested Procedure:
- Using a spoon or stirrer dissolve as much of the chosen material (Epsom salt, washing soda, or baking soda) as possible into two cups one-half to three-quarters full of very warm water. Do this by adding several spoonfuls of the chosen material to the water in each cup and then stirring until it is completely dissolved. It will be easier for the students to witness the material being dissolved if the cups are clear/see-through but it is not necessary. Repeat this process until the solution is well concentrated. A 2:1 ratio of material to water is ideal. If desired, a couple of drops of food coloring can be added to the solution in each cup.
- Tie a paperclip to each end of the piece of cotton string. Soak the piece of string in the solution until it is completely saturated.
- Fold the piece of aluminum foil to form a small tray. This can be done by folding in the edges and molding the corners. A small plate or saucer may also be used.
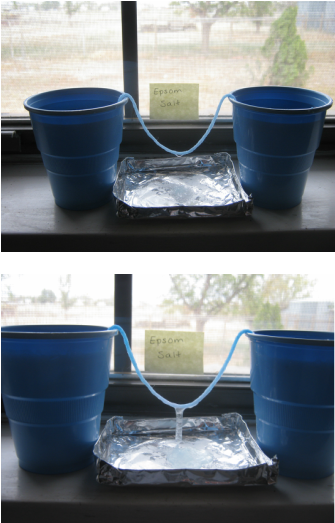
- If space allows place the cups near a window to allow the sunlight to aid in evaporation. Lay the string on the cup so that one end of the string is well inside the solution in one cup and the other end of the string is well inside the solution in the other cup. The middle section of the piece of string needs to dip below the water levels in the cups to create osmosis pull on the water.
- Place the aluminum tray between the two cups so that it is under the middle of the piece of string. Put a small amount of dry material (Epsom salt, washing soda or baking soda depending on the solution being used) on the tray. The distance between the middle section of the piece of string and the tray should be adjusted to minimize the amount of splattering that may occur. This distance will depend on the height of the cups being used.
- Leave the cups for a couple of days. It is important that they will not be moved or disturbed.
Note: The solution in the cups will drip onto the tray creating a “speleothem”. Epsom salt and washing soda are likely to result in the growth of stalactites and stalagmites. A speleothem known as a “column” may form if a stalactite and a stalagmite connect. Baking soda is likely to result in the formation of crystals along the piece of string. This closely resembles speleothems known as “popcorn” and “frostwork” and will be discussed in Lesson #9.
Students should see crystals forming within an hour or two after the initial set up of their experiment, however crystal growth may not happen every time. If multiple solutions are being used students should notice that the crystals of the different solutions are different.
Distribute the materials among the pairs or small groups of students. Divide the class according to how many different solutions will be used. Using two or more solutions will allow for a good comparison at the conclusion of the experiment. Allow the pairs or small groups of students time to set up their experiments.
Wrap-Up/Conclusion (During class period of initial set-up)
Once all of the pairs or small groups of students have completed setting up their experiments explain to the students that just like it takes time for speleothems to form in a cave it will also take some time for their speleothems to form in the classroom. Tell the students that over the next couple of days you will allow them a few minutes during the class period to record observations about their speleothem experiments on their Dripping Crystals Student Worksheets. Encourage the students to write descriptions about what they observe and sketch what is happening with their speleothem experiments. Pass out the Dripping Crystals Student Worksheets and allow the students a few minutes to record the status of their speleothem experiment on Day #1. Tell the student to make sure to list what type of solution they are using (Epsom salts, washing soda or baking soda).
Over the next couple of days have the students check their experiments and record their observations. Caution the students that once “speleothems” begin to form they are extremely fragile and any movement of the string could cause them to break. If the students are extremely careful they may choose to use a ruler to record the length of any speleothem growth.
Wrap-Up/Conclusion (During class period a couple of days after initial set-up)
Display the word “speleothem” for the students to view. Ask the students what a speleothem is. What are examples of speleothems? How do stalactites and stalagmites form? What factors can affect the growth rate of speleothems. Briefly, review the mechanisms of speleothem growth with the students.
Discuss the results of the speleothem experiments as a class. Have pairs or small groups of students share what they observed. If multiple solutions were used ask the class if they observed any differences between the growth of their speleothem and the speleothems of their classmates. Did the students notice crystals in other places than at the dip of the piece of string? Where and why? If the students are familiar with the term and process of osmosis ask them what property of water allows the string to stay wet and drip water. (Osmosis) Ask the students what they noticed about the level of the water in the cups. (It went down) What happened to the water? (Much of the water was pulled into the string and dripped onto the tray) Ask the students if this would happen in an actual cave. Explain that the water would drip and go further into the ground. Ask the students what would happen if there was no recharge. What would this mean to the cave system? (Less precipitation on the surface can result in less water percolating through the ground and less water entering the cave)
Project pictures of decorated cave passages for the students to view. Stress the uniqueness and fragility of speleothems. Tell the students that deep within the earth, drop by drop, crystal by crystal, speleothems are forming on the floors, ceilings, and walls of caves. Explain to the students that just like their “speleothems” were fragile, so are those found in caves. What do they think would happen if a person was careless in a cave? Ask the students to think about how long it may take a speleothem to form. Explain to the students that once damaged or destroyed, cave formations can never be replaced. Ask the students what they could do to help protect speleothems (Educate others about how they are formed and how unique and fragile they are; If they visit a cave do not touch the speleothems; etc.)
| lesson_8_dripping_crystals.pdf |
| lesson_8_dripping_crystals_student_worksheet.pdf |
