Lesson 7 - Create a Cave
Lesson Overview:
In this lesson students will create a model to demonstrate how caves form.
Objectives:
Students will be able to:
Standards Addressed:
National Science Education Standards: 5th-8th grade
Duration of Lesson/Time Requirement: 40 minutes
Materials Required:
For each pair/small group of students:
12 Sugar cubes (representing limestone)
4-6 oz Modeling clay (representing topsoil)
1 see-through bowl/container (preferably with a flat side)
Toothpick
Spray bottle filled with warm water (representing rainfall)
*Food coloring may be added to the water to make “passageways” more clearly visible
Create A Cave Student Worksheet (1 per student)
Pencil (1 per student)
Classroom Technology:
Computer with Internet connection and projection capabilities and/or SMART Board
“How Caves Form” interactive
http://www.pbs.org/wgbh/nova/earth/how-caves-form.html
Set-Up:
Gather materials necessary for Activity #1 and divide accordingly for pairs/small groups of students.
Procedure:
Introduction
Review with the students what is needed to form a cave. (Limestone, water mixed with carbonic acid and time). Discuss how caves form as a class and generate a list of what the students know about cave formation. Be sure to cover these important points:
In this lesson students will create a model to demonstrate how caves form.
Objectives:
Students will be able to:
- Create a cave model.
- Demonstrate the process of cave formation through dissolution of limestone.
Standards Addressed:
National Science Education Standards: 5th-8th grade
- Content Standard A: Science as Inquiry
- Content Standard D: Earth and Space Science
- Research and Information Fluency
Duration of Lesson/Time Requirement: 40 minutes
Materials Required:
For each pair/small group of students:
12 Sugar cubes (representing limestone)
4-6 oz Modeling clay (representing topsoil)
1 see-through bowl/container (preferably with a flat side)
Toothpick
Spray bottle filled with warm water (representing rainfall)
*Food coloring may be added to the water to make “passageways” more clearly visible
Create A Cave Student Worksheet (1 per student)
Pencil (1 per student)
Classroom Technology:
Computer with Internet connection and projection capabilities and/or SMART Board
“How Caves Form” interactive
http://www.pbs.org/wgbh/nova/earth/how-caves-form.html
Set-Up:
Gather materials necessary for Activity #1 and divide accordingly for pairs/small groups of students.
Procedure:
Introduction
Review with the students what is needed to form a cave. (Limestone, water mixed with carbonic acid and time). Discuss how caves form as a class and generate a list of what the students know about cave formation. Be sure to cover these important points:
- The largest and greatest number of caves are found in areas of extensive deposits of limestone.
- Limestone is a sedimentary rock consisting of calcium carbonate (CaCO3) and is composed mainly of the mineral calcite.
- Calcite dissolves in many types of acids.
- As precipitation (rain or snow melt) percolates through the soil, some of the carbon dioxide (CO2) produced by decaying plant and animal matter, dissolves to form a carbonic acid solution.
- The slightly acidic water seeps through cracks in the ground and slowly dissolves calcite out of the limestone. The water carries away the dissolved calcite.
- Over long periods of time (hundreds, thousands and perhaps even millions of years) the water continues to dissolve along underground fractures and rock layers, and hollows out spaces within the rock. These spaces are called passageways and caves.
Activity #1
Explain to the students that they are going to work in pairs or small groups to create a model of a cave and that they will have the opportunity to observe how caves form.
Explain the procedure to the students by demonstrating how to construct a cave model. Tell the students that they will construct their caves using sugar cubes, modeling clay, and water. Ask the students what they think each component of the model represents. Tell the students that the sugar cubes represent limestone, the modeling clay represents topsoil/surface of the earth, and the spray bottle represents rainfall.
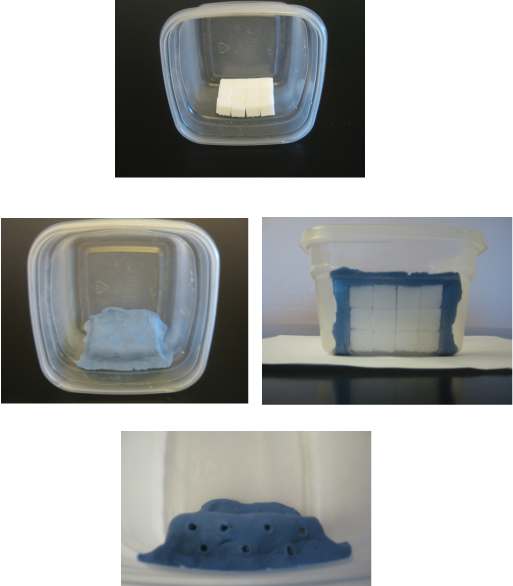
Explain to the students that they are to stack the sugar cubes against the side of their see-through container. It will be easier for them to do this if they tip the container onto its side. Tell the students that they may arrange their sugar cubes in any way, but that the sugar cubes will determine the shape of their cave. They need to make sure that the sides of the sugar cubes are touching one another and that there are no spaces or gaps between them.
Next tell the students that they are to use the modeling clay to seal their stack of sugar cubes inside a dome. Explain to the students that the easiest way to do this is to flatten the clay and then lay it over the sugar cubes. They should then press the clay tightly against the walls and bottom of the see-through container, as well as against the sugar cubes themselves. They can then use smaller pieces of clay to seal the edges more tightly. The clay layer should be approximately 1/8 inch thick. Stress to the students that the sugar cubes pressed up against the side of the see-through container should remain visible. Tell the students that this will act as a window to their cave.
Lastly, use a toothpick to poke a few holes through the clay. Tell the students to be sure that the holes go all the way through to the sugar cubes. Ask the students what they think the toothpick holes represent. (The cracks and holes in the earth’s surface that allow water to percolate more easily to the bedrock)
Explain to the students that they will all receive a copy of the Create A Cave Student Worksheet. Once they have constructed their cave model they are to record what it looks like by sketching it on their worksheet.
Pass out the see-through containers, sugar cubes, modeling clay, toothpicks and Create A Cave Student Worksheets to the pairs or small groups of students. Allow the class time to construct their cave models and record them on their student worksheets.
Once the pairs or small groups of students have completed sketching their cave models, explain that they will now spray water on their models. Ask the students what they think will happen as the water seeps through the clay. Tell them to record their predictions on their Create A Cave Student Worksheets.
Tell the students that they will now use the spray bottles to spray water on top of the clay. Explain to the students that if the water does not seep into the toothpick holes that they may need to make the holes larger. Tell the students that as the water seeps through the clay and into the sugar cubes they are to record their observations on their Create A Cave Student Worksheets.
Pass out the spray bottles to the pairs or small groups of students. Allow the students time to spray their cave models until the sugar cubes are no longer their original shape or they have completely dissolved. On their Create A Cave Student Worksheets have the students describe what happened to the sugar cubes as the water seeped into their cave. Tell the students to draw a picture of what their cave looks like at the conclusion of the activity.
Wrap-Up/Conclusion
Upon completion of the experiment and clean up of the students’ work stations discuss the results of the activity as a class. Have pairs or small groups of students share what happened with their cave models. Compare and contrast the results of the pairs or small groups of students. Did any of the caves form exactly the same? Tell the class that no two caves are exactly alike and that their activity helps demonstrate that all caves are unique.
Project/display the “How Caves Form” interactive for the students to view (http://www.pbs.org/wgbh/nova/earth/how-caves-form.html). As a class review how rainwater helps to form caves. Ask the students if they can think of other ways that caves form. (waves, lava, bacteria) As time allows investigate these other methods of how caves form using the interactive.
Explain to the students that they are going to work in pairs or small groups to create a model of a cave and that they will have the opportunity to observe how caves form.
Explain the procedure to the students by demonstrating how to construct a cave model. Tell the students that they will construct their caves using sugar cubes, modeling clay, and water. Ask the students what they think each component of the model represents. Tell the students that the sugar cubes represent limestone, the modeling clay represents topsoil/surface of the earth, and the spray bottle represents rainfall.
Explain to the students that they are to stack the sugar cubes against the side of their see-through container. It will be easier for them to do this if they tip the container onto its side. Tell the students that they may arrange their sugar cubes in any way, but that the sugar cubes will determine the shape of their cave. They need to make sure that the sides of the sugar cubes are touching one another and that there are no spaces or gaps between them.
Next tell the students that they are to use the modeling clay to seal their stack of sugar cubes inside a dome. Explain to the students that the easiest way to do this is to flatten the clay and then lay it over the sugar cubes. They should then press the clay tightly against the walls and bottom of the see-through container, as well as against the sugar cubes themselves. They can then use smaller pieces of clay to seal the edges more tightly. The clay layer should be approximately 1/8 inch thick. Stress to the students that the sugar cubes pressed up against the side of the see-through container should remain visible. Tell the students that this will act as a window to their cave.
Lastly, use a toothpick to poke a few holes through the clay. Tell the students to be sure that the holes go all the way through to the sugar cubes. Ask the students what they think the toothpick holes represent. (The cracks and holes in the earth’s surface that allow water to percolate more easily to the bedrock)
Explain to the students that they will all receive a copy of the Create A Cave Student Worksheet. Once they have constructed their cave model they are to record what it looks like by sketching it on their worksheet.
Pass out the see-through containers, sugar cubes, modeling clay, toothpicks and Create A Cave Student Worksheets to the pairs or small groups of students. Allow the class time to construct their cave models and record them on their student worksheets.
Once the pairs or small groups of students have completed sketching their cave models, explain that they will now spray water on their models. Ask the students what they think will happen as the water seeps through the clay. Tell them to record their predictions on their Create A Cave Student Worksheets.
Tell the students that they will now use the spray bottles to spray water on top of the clay. Explain to the students that if the water does not seep into the toothpick holes that they may need to make the holes larger. Tell the students that as the water seeps through the clay and into the sugar cubes they are to record their observations on their Create A Cave Student Worksheets.
Pass out the spray bottles to the pairs or small groups of students. Allow the students time to spray their cave models until the sugar cubes are no longer their original shape or they have completely dissolved. On their Create A Cave Student Worksheets have the students describe what happened to the sugar cubes as the water seeped into their cave. Tell the students to draw a picture of what their cave looks like at the conclusion of the activity.
Wrap-Up/Conclusion
Upon completion of the experiment and clean up of the students’ work stations discuss the results of the activity as a class. Have pairs or small groups of students share what happened with their cave models. Compare and contrast the results of the pairs or small groups of students. Did any of the caves form exactly the same? Tell the class that no two caves are exactly alike and that their activity helps demonstrate that all caves are unique.
Project/display the “How Caves Form” interactive for the students to view (http://www.pbs.org/wgbh/nova/earth/how-caves-form.html). As a class review how rainwater helps to form caves. Ask the students if they can think of other ways that caves form. (waves, lava, bacteria) As time allows investigate these other methods of how caves form using the interactive.
| lesson_7_create_a_cave.pdf |
| lesson_7_create_a_cave_student_worksheet.pdf |
