Lesson 13 - Are There Caves Near You?
Lesson Overview:
Students will investigate whether or not there are caves located near where they live/go to school.
Objectives:
Students will be able to:
1. Explain why caves are or are not located where they live/go to school.
Standards Addressed:
National Science Education Standards: 5th-8th grade
Duration of Lesson/Time Requirement: 40 minutes; Additional time required for optional activities
Materials Required:
Picture of a cave (optional)
USA Longest Caves by State Student Worksheet (1 per student)
Geology of My State Student Worksheet (1 per student)
Classroom Technology:
Computer with Internet connection and projection capabilities and/or SMART Board
Several classroom computers with Internet connection for student use
USA Longest Caves by State (http://www.caverbob.com/)
Google Earth (optional)
National Atlas.gov (http://www.nationalatlas.gov/)
Wordle (http://www.wordle.net/)
Set-Up:
Gather materials necessary.
Procedure:
Introduction
Display a picture of a cave and/or write the word “cave” for the students to see. Ask the students what a cave is. What is the study of caves called? (speleology) Ask the students if they think there are caves close to where they live/go to school. Why or why not? Discuss.
Tell the class that they are going to spend some time investigating whether or not caves are located where they live/go to school.
Activity #1
The list of the USA longest caves by state is located on the website http://www.caverbob.com/. Explain to the students that they are to visit the website and look up whether or not any caves are listed for the state in which they live. They will record this information on the USA Longest Caves by State Student Worksheet. Tell the students that the states are listed alphabetically and that the caves are listed by current known length with the longest cave in the state being listed first. Information provided about each cave includes:
Explain to the students that the caves listed are only those that have been mapped. If no caves are listed for the state that does not necessarily mean that there are not any caves. There may still be caves located in the state but they have not been mapped and/or that data has not been submitted to the website. Have the students work individually or in pairs/small groups at several computers to accomplish this task. If no caves are listed for the state in which the students live/go to school have them speculate as to the reasons why caves may not be found in their area.
Optional activity to be completed if time allows:
If caves are listed for the state in which the students live/go to school project Google Earth on a large screen for the class to view. Create a “placemark” for the school. Have the students create placemarks for the caves listed for the state. This will create a good visual as to where the caves are located in relation to the location of the school.
Activity #2
Review with the class the process in which caves form. What type of rock are caves most commonly found within? (sedimentary rock/limestone) Ask the students if they are familiar with the rock types found where they live/go to school. Have the students work individually or in pairs/small groups to investigate the rock type in their state and local area using National Atlas.gov (http://www.nationalatlas.gov/)
Project National Atlas.gov (http://nationalatlas.gov/) for the class to view. Explain to the students that they are to use the Map Maker feature to locate the state in which they live and investigate the geology of it. If necessary give a brief demonstration to review how to use Map Maker.
On the website http://www.nationalatlas.gov/ click on “Map Maker”.
In Map Maker:
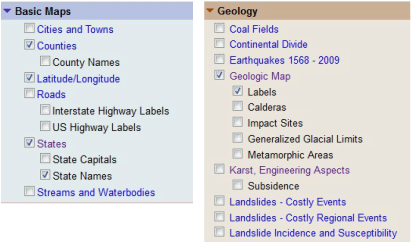
1. Under “Basic Maps” select:
a. Counties
b. Latitude/Longitude (optional)
c. States
d. State names
2. Under “Geology” select:
a. Geologic Map
b. Labels (optional)
3. Select “Redraw Map”
4. Select “Zoom to State(s)”
5. Use the drop down menu to select the state in which the students live/
go to school.
6. Look at the rock types found in the state. Zoom in and out as necessary. Use the colors, labels and “Map Key” to identify the rock types found throughout the state.
Allow each individual student or pair/small group time to investigate the geology of the state where they live/go to school using Nationalatlas.gov. Tell them to record the information they discovered on the Geology of My State Student Worksheet. The students do not have to get too specific. They can use the Geologic Map Key to determine if the rocks are sedimentary, volcanic (igneous), plutonic, or metamorphic.
Students will investigate whether or not there are caves located near where they live/go to school.
Objectives:
Students will be able to:
1. Explain why caves are or are not located where they live/go to school.
Standards Addressed:
National Science Education Standards: 5th-8th grade
- Content Standard D: Earth and Space Science
- Creativity and Innovation
- Communication and Collaboration
- Research and Information Fluency
- Critical thinking, Problem Solving, and Decision Making
- Technology Operations and Concepts
Duration of Lesson/Time Requirement: 40 minutes; Additional time required for optional activities
Materials Required:
Picture of a cave (optional)
USA Longest Caves by State Student Worksheet (1 per student)
Geology of My State Student Worksheet (1 per student)
Classroom Technology:
Computer with Internet connection and projection capabilities and/or SMART Board
Several classroom computers with Internet connection for student use
USA Longest Caves by State (http://www.caverbob.com/)
Google Earth (optional)
National Atlas.gov (http://www.nationalatlas.gov/)
Wordle (http://www.wordle.net/)
Set-Up:
Gather materials necessary.
Procedure:
Introduction
Display a picture of a cave and/or write the word “cave” for the students to see. Ask the students what a cave is. What is the study of caves called? (speleology) Ask the students if they think there are caves close to where they live/go to school. Why or why not? Discuss.
Tell the class that they are going to spend some time investigating whether or not caves are located where they live/go to school.
Activity #1
The list of the USA longest caves by state is located on the website http://www.caverbob.com/. Explain to the students that they are to visit the website and look up whether or not any caves are listed for the state in which they live. They will record this information on the USA Longest Caves by State Student Worksheet. Tell the students that the states are listed alphabetically and that the caves are listed by current known length with the longest cave in the state being listed first. Information provided about each cave includes:
- Rank in state
- Cave name (Note: The type of cave will be listed in parentheses following the cave name if it is not a limestone cave e.g. saltpeter, lava tube, gypsum, etc)
- County where the cave is located
- Length of cave (in miles)
- Length of cave (in meters)
- Depth of cave (in feet)
- Depth of cave (in meters)
Explain to the students that the caves listed are only those that have been mapped. If no caves are listed for the state that does not necessarily mean that there are not any caves. There may still be caves located in the state but they have not been mapped and/or that data has not been submitted to the website. Have the students work individually or in pairs/small groups at several computers to accomplish this task. If no caves are listed for the state in which the students live/go to school have them speculate as to the reasons why caves may not be found in their area.
Optional activity to be completed if time allows:
If caves are listed for the state in which the students live/go to school project Google Earth on a large screen for the class to view. Create a “placemark” for the school. Have the students create placemarks for the caves listed for the state. This will create a good visual as to where the caves are located in relation to the location of the school.
Activity #2
Review with the class the process in which caves form. What type of rock are caves most commonly found within? (sedimentary rock/limestone) Ask the students if they are familiar with the rock types found where they live/go to school. Have the students work individually or in pairs/small groups to investigate the rock type in their state and local area using National Atlas.gov (http://www.nationalatlas.gov/)
Project National Atlas.gov (http://nationalatlas.gov/) for the class to view. Explain to the students that they are to use the Map Maker feature to locate the state in which they live and investigate the geology of it. If necessary give a brief demonstration to review how to use Map Maker.
On the website http://www.nationalatlas.gov/ click on “Map Maker”.
In Map Maker:
1. Under “Basic Maps” select:
a. Counties
b. Latitude/Longitude (optional)
c. States
d. State names
2. Under “Geology” select:
a. Geologic Map
b. Labels (optional)
3. Select “Redraw Map”
4. Select “Zoom to State(s)”
5. Use the drop down menu to select the state in which the students live/
go to school.
6. Look at the rock types found in the state. Zoom in and out as necessary. Use the colors, labels and “Map Key” to identify the rock types found throughout the state.
Allow each individual student or pair/small group time to investigate the geology of the state where they live/go to school using Nationalatlas.gov. Tell them to record the information they discovered on the Geology of My State Student Worksheet. The students do not have to get too specific. They can use the Geologic Map Key to determine if the rocks are sedimentary, volcanic (igneous), plutonic, or metamorphic.
Tell the students that you would like them to investigate the geology of their town/school.
In Map Maker
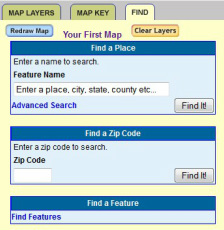
1. Select “Find”
2. Enter a name to search (e.g. the name of the school, the city & state where the students live)
3. Select “Find It!” (Note: multiple records may be found and students will have to select the feature name that best matches their search)
4. Select “Zoom to Feature”
5. Use the colors, labels, and “Map Key” to identify the rock type for the school and/or city and state where the students are located. Zoom in and out as necessary.
Allow each individual student or pair/small group time to investigate the geology of where they live/go to school using Nationalatlas.gov. Tell them to record the information they discovered on the Geology of My State Student Worksheet.
As a class discuss the students’ findings regarding the geology of their state and local area. Ask questions such as:
Optional activity to be completed if time allows:
If caves were listed for the state in which the students live/go to school on the website http://www.caverbob.com/. Use National Atlas.gov to “Find” several of the caves. This most likely will have to be done by entering the name of the county that the cave is located in. Compare/contrast the geology of the location of the caves with that of the location of the school/town where the students live. This can also be done by projecting side by side images of the placemarks saved using Google Earth and the geologic map of the state using National Atlas.
Wrap-Up/Conclusion
Tell the students that they have become quite the “speleologists” spending time learning about caves. With all of their new knowledge about caves what do they think of now when they hear or see the word “cave”. Allow several of the students to share their answers. Record and discuss as a class.
Have each student use Wordle (http://www.wordle.net/) to generate a “word cloud” about caves.* The students should include at least 10 different thoughts and feelings that they have about caves. Have their opinions about caves changed as they learned more about them?
Encourage the students to experiment with different fonts, layouts, and color schemes. Once each student is satisfied with his/her “wordle” have them print it out. Have each student compare/contrast this wordle with the original wordle they created in Lesson #1. Discuss as a class.
*If the technology to complete this activity is not available have the each student create their “word cloud” about caves on a sheet of paper or poster board. They can use a variety of different supplies (crayons, colored pencils, markers, etc.) to express how they feel about caves.
In Map Maker
1. Select “Find”
2. Enter a name to search (e.g. the name of the school, the city & state where the students live)
3. Select “Find It!” (Note: multiple records may be found and students will have to select the feature name that best matches their search)
4. Select “Zoom to Feature”
5. Use the colors, labels, and “Map Key” to identify the rock type for the school and/or city and state where the students are located. Zoom in and out as necessary.
Allow each individual student or pair/small group time to investigate the geology of where they live/go to school using Nationalatlas.gov. Tell them to record the information they discovered on the Geology of My State Student Worksheet.
As a class discuss the students’ findings regarding the geology of their state and local area. Ask questions such as:
- What rock types are found throughout the state? Are these rock types likely to have caves found within them?
- What is the rock type found where their school/town is located? Is this a rock type that is likely to have caves found within it?
- Are there caves found near their school/town? Why or why not?
Optional activity to be completed if time allows:
If caves were listed for the state in which the students live/go to school on the website http://www.caverbob.com/. Use National Atlas.gov to “Find” several of the caves. This most likely will have to be done by entering the name of the county that the cave is located in. Compare/contrast the geology of the location of the caves with that of the location of the school/town where the students live. This can also be done by projecting side by side images of the placemarks saved using Google Earth and the geologic map of the state using National Atlas.
Wrap-Up/Conclusion
Tell the students that they have become quite the “speleologists” spending time learning about caves. With all of their new knowledge about caves what do they think of now when they hear or see the word “cave”. Allow several of the students to share their answers. Record and discuss as a class.
Have each student use Wordle (http://www.wordle.net/) to generate a “word cloud” about caves.* The students should include at least 10 different thoughts and feelings that they have about caves. Have their opinions about caves changed as they learned more about them?
Encourage the students to experiment with different fonts, layouts, and color schemes. Once each student is satisfied with his/her “wordle” have them print it out. Have each student compare/contrast this wordle with the original wordle they created in Lesson #1. Discuss as a class.
*If the technology to complete this activity is not available have the each student create their “word cloud” about caves on a sheet of paper or poster board. They can use a variety of different supplies (crayons, colored pencils, markers, etc.) to express how they feel about caves.
| lesson_13_are_theres_caves_near_you.pdf |
| lesson_13_usa_longest_caves_by_state_student_worksheet.pdf |
| lesson_13_geology_of_my_state_student_worksheet.pdf |
